Feeds:
Posts
Comments

Archive for the ‘Recipes’ Category

Making Poldark has been Nooked at last!

Nick it on NOOK–it’s a steal!

It’s available now on NOOK.

Making Poldark: Memoir of a BBC/Masterpiece Theatre Actor
by Robin Ellis
This revised version came out in April 2012 and is greatly expanded–including new photos from Winston Graham’s personal Poldark photo album.
And while we are at it…
Delicious Dishes for Diabetics
Delicious Dishes for Diabetics 

Read Full Post »

Meredith’s Ayervedic consultant gave lentils the thumbs up yesterday.

A break for me–I love all lentils.

Meredith’s not so keen, though she likes the tastetheir tendency to “airify” is not so agreeable.

There’s a big glass jar of green/grey Puy-type lentils on the shelf in the larder that’s seen no action for months, so…

inspired by a recipe in Rose Elliott’s Bean Book that combines lentils and spinach (and remembering the pound plus of beautiful organic spinach in the fridge)–I gleefully took it down last night.

This and is another one pot meal–though some brown basmati rice makes for a good companion !

for 4

8oz green/grey lentils–washed thoroughly, but no need to soak them

2 celery sticks–washed

1 clove garlic–peeled

half a large onion–peeled

water to cover the lentils by an inch or a bit more

the other half of the onion–chopped

1 clove garlic–pulped with half a teaspoon of salt

1 teaspoon cumin powder

1 teaspoon coriander powder

450gms/1lb spinach–washed and drained. (Use frozen if you like–thawed and squeezed)

a couple of pinches of salt

juice of a lemon

  • Put the lentils in a pan with the water and add the celery, onion and garlic.
  • Bring to the boil, turn the heat to low and cook covered until the lentils are tender–try not to overcook them to mush.  The time depends on the age of the lentils–about 25 minutes; check them from time to time.
  • While the lentils are cooking–heat a tablespoon of oil in a sauté pan and add the chopped onion and garlic.
  • Cook gently until they are soft and beginning to colour.
  • Add the cumin and coriander and cook for a minute or two longer.
  • Remove the celery, onion and garlic from the lentils and drain them of most of the excess liquid.
  • Add the spiced onion and garlic mix and turn it all over to coat the lentils.
  • While this is proceeding find time to put the spinach in a large saucepan with a couple of pinches of salt snuck in between the leaves–no extra water is needed.

  • Cook on the lowest heat, covered–until it has wilted.
  • Drain it of excess water but don’t squeeze it.
  • Add it to the lentils and squeeze over the lemon juice
  • Turn it over carefully–and serve with some rice on the side and a couple of lemon quarters on the plate.

Evidence of a change of mind!

Read Full Post »

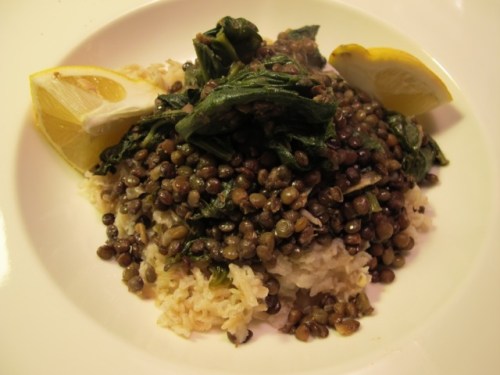
I like a plate of beans–with olive oil swirled over them.

Plate of white beans and olive oil at La Sostanza, Firenze. An aside to their famous artichoke omelette.

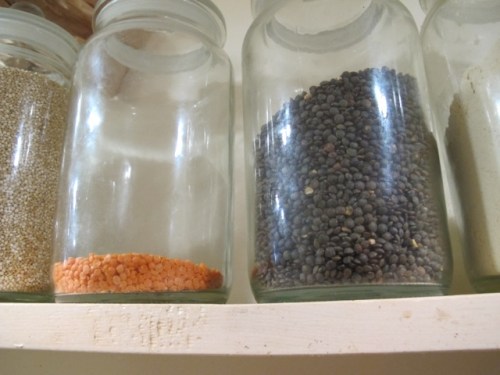
There are good quality beans available now in glass jars. Quickly  heated up and plated.

But perhaps you have a packet of dry white beans that may have spent some time on a shelf–daring you to do something about them?

Ever present, silently reproachful, waiting for some action–they can be intimidating!

The sooner they are treated the better and it’s simple this way.

Put half a pound of dry beans in a bowl and cover them with cold water.

Leave to soak overnight.

Heat the oven to 170C/340F.

Drain the beans and rinse them.

Put them into a medium casserole/pot/pan and cover them again with a top-of- the-thumb joint of cold water.

Cover the casserole and bring it to the boil.

Place it on the middle shelf of the oven and leave for 40 minutes.

Test for softness, leaving it longer if necessary–the older the beans, the longer it will take.

Add a teaspoon of salt to the casserole and leave to cool in the liquid.

When you are ready to eat, reheat them in a little of their liquid, adding half an organic vegetable stock cube, crumbled.

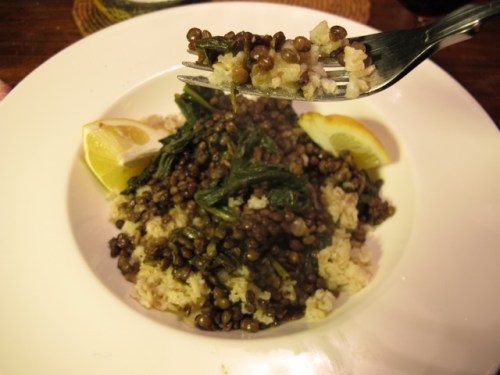
Drain the beans and serve them hot. Season to taste with salt and pepper, adding a swirl of the best olive oil you have.

The plate of beans I can do, but the high-sided omelette filled with crispy roasted artichokes still eludes me.

Un de ces jours! 

Read Full Post »

I bought some impressive looking fennel at the organic market.

It sat on the kitchen island demanding attention.

I sliced one to eat raw at lunch after pasta–with a piece of parmesan or pecorino and some of the new olive oil. We had enjoyed doing this in Tuscany–cleanses the palate (and helps avoid flatulance, according to my researcher–aka Meredith!)

It was tenderly crunchy–not in the least stringy.

Fennel gratin I thought–supper with a sweet potato and tarator sauce.

I’d never cooked it before and my search for guidance led me to the Riverford Farm Cookbook.

Rosemary and garlic was suggested with cream and parmesan.

I have substituted coconut cream (see below if you are unfamiliar with this ingredient) and added more parmesan.

Serves 2 as a main course–4 as an accompanying vegetable.

4 largish fennel bulbs–cleaned, cored and sliced vertically in half inch pieces

1 pint/450ml stock to blanch the fennel–I use organic vegetable stock cubes

3 garlic cloves–peeled and crushed with a knife

1 teaspoon rosemary needles–chopped fine

160ml coconut creamthe difference between coconut milk/cream and cream of coconut is fully explained here: http://www.thekitchn.com/whats-the-difference-coconut-m-75446/. It looks like milk, it is NOT sweetened and it does NOT taste of coconut!

1/2 tablespoon parmesan to mix in with the cream+ more for the topping–a tablespoon perhaps.

(The version below is fat free.)

salt and pepper

  • Bring the stock to the boil in a wide shallow pan.
  • Add the fennel and cook for about 5 minutes–until it’s beginning to soften.

  • Remove it to a bowl with a draining spoon and let it cool a little.

This looks uncooked–but it is!

  • Combine the coconut cream with the garlic and rosemary in a small pan and gently bring to the boil.
  • Turn off the heat.

  • Season this mix and add half the cheese.
  • Pour it on the fennel and turn it all over thoroughly.
  • Put the gratin mix in an oven proof dish–it is oven-ready now.
  • This can be prepared beforehand and set aside, covered with foil.
  • An hour or so before you are planning to eat…
  • Heat the oven to 180C/360F
  • Cook it in the oven for 30 minutes.
  • Take it out and lift off the foil.
  • Sprinkle over parmesan to cover and put it back uncovered in the oven for a further 15 minutes.
  • It will have browned nicely on top.

Read Full Post »

Our friend Helen is a natural cook.

She rarely uses recipe books; rather she builds a dish from the ingredients to hand–throwing in this and that from time to time with an instinctive sense of when it’s right.

I love watching her cook.

She prepared this pasta on our visit last year–a reviving lunch after a morning working in the olive grove.

It was creamily delicious–hard not to take another spoonful! It seems to get better and better just sitting on the table. How did she managed to make it turn out that way?

I asked her to cook it again for us this November–while I took notes.

She uses a variety of courgette/zucchini that is paler than those I find here and has raised ridges–ideal for catching the garlicky olive oil sauce.

No matter–I shall try this at home with the common dark green variety.

Here’s what she did:

for 4

a pound and a half/750gms zucchini/courgettes–sliced evenly

3 tblsps olive oil (their own!)

2 garlic cloves–peeled, crunched under a knife and roughly chopped

a pinch of chili powder–(Helen adds more when her son Lucio is expected for lunch. Sometimes she doesn’t add any when it’s just her and Keith.)

hot water

salt

A handful of chopped parsley

400gms/16oz–wholewheat spiral pasta (or other shapes)

parmesan cheese to grate for those that like it

  • Helen sets plenty of water to boil for the pasta.
  • Then she heats the oil in a large sauté pan and adds the garlic, letting it take on some color.
  • Next she adds the courgettes and a tablespoon of hot water; she shakes the pan to coat the courgettes in the oil and sprinkles over some salt.

  • She leaves the mixture to cook gently on a lowish flame, jiggling it from time to time, for about 20 to 25 minutes.
  • A little more salt and the parsley is added towards the end.

  • She cooks the pasta just before al dente, then drains it–saving some of the hot water.
  • She adds that water to the courgettes in the pan.

(Those additional tablespoons of hot pasta water prevent the dish from tasting too dry. )

  • She covers the pan until the moment of serving so the pasta stays moist and warm.
  • We enjoyed it with some grated parmesan–Helen leaves it as it is.

Read Full Post »

This is from Delicious Dishes for Diabetics.

Our friend Mark tried this the other day and wrote to me afterwards saying:

the peppers and onion you did for us – “salad with an edge” – delicious, but mine was way overcooked. So either my oven is hot, or yours is cool. Have you got a reliable thermometer to check it?

So I did it again a couple of days ago and reduced the oven time to 15 minutes–but kept the same temperature. Meredith thought they were still too charred–not for me though!

The thickness of the peppers is a factor.

These below are a thinner, cone-shaped variety grown locally.

The recipe asks for 220C –which I normally reduce by 10 degrees because I have a convection oven (fan-assisted).

(Next time I cook these, I’ll try them at 200C (fan-assisted) for 20 minutes.)

Thanks Mark–useful feedback!

Serves 4

Here’s a nice gooey slightly piquant salad that profits from the addition of some flaked very fresh feta or goat’s cheese.You could also add a few slices of thin pancetta for the last 10 minutes of cooking.

4 red peppers–cut in half lengthwise, deseeded and cut into strips

1 fresh red chili–not too hot, deseeded and cut into strips
4 tbsp olive oil
1 large or 2 medium red onions--peeled, cut in half and thickly sliced

2 cloves of garlic–peeled and sliced

2 tbsp balsamic vinegar

fresh basil–chopped (if available)

Heat the oven at 210°C (normal oven–this is a CHANGE from the recipe in my book!)/425°F/Gas Mark

  • Put the peppers and the chili in a bowl and dribble over 3 tablespoons of oil.
  • Turn over and coat them thoroughly in the oil.
  • Line a shallow medium-sized oven tray with foil and brush with oil.
  • Spread the peppers and chili evenly over the tray.
  • Leave in the oven for 20 minutes before spreading over the onion and garlic and cooking for a further 20 minutes.
  • Everything should be lightly charred in a nice way, i.e. edible!
  • Sprinkle over the balsamic, the torn basil and more olive oil if you like.

Read Full Post »

TARAT!  TARAAHH!!–a sauce for all seasons–TARATOR!

Discovered this sauce while looking for an alternative to yogurt.

Meredith is cutting out dairy products for a few weeks while she takes advice from an ayurvedic practitioner in Albi.

We’ve been we eating mainly vegetarian–and more lightly in the evenings.

It is a challenge for me and I’m enjoying it.

New Directions I’m calling it and it will be a chapter in the new book Healthy Eating for life.

Tarator is variously described as a yogurt soup from Bulgaria and a sauce from Lebanon.

My version of this tahini based sauce is loose, lemony and lightly garlicky, to be enjoyed with meat or vegetables.

For lunch today I’m revisiting a salad from Delicious Dishes-Roast Red Pepper Salad with an edge–(recipe tomorrow).

We had the sauce with it and enjoyed it.

for 2

3 tblsps tahini

2 tblsps lemon juice

1 garlic clove–peeled and pulped in 1/2 teaspoon salt

1/3 teaspoon cumin powder

4 tblsps water

1 tblsp parsley–chopped

  • Put the first five ingredients in mixer and whizz to a smooth runny consistency.
  • Stir in the parsley
  • Add more salt to your taste.

Read Full Post »

Traditionally risotto is made with Italian arborio rice–a round variety that plumps up well as it absorbs liquid, while still retaining a bite at its centre.

As white rice–a carbohydrate converting more quickly to sugar–it’s not ideal for those with diabetes.

Pearl barley is an acceptable substitute. It has a delicious nuttiness all it own while modestly hosting the mushrooms and leeks (in this case).

This takes a little time but when you come to cook it, the zen of making risotto (!) kicks in and it becomes a quiet meditation followed by a satisfying chew.

Risotto has the virtue of being a meal-in-one dish–eventually!

As with omelettes, you add the the subject to the base and serve it in one.

This is adapted from an original recipe by Emma Booth who won a prize with it in Stylist.co.uk magazine!

for 2/3

2  garlic heads–cloves separated but skin left on

4 tbsps olive oil

1 oz dried mushrooms–soaked in 200ml warm water.

(These are not always easy to find but they’re a good taste engine, adding depth to the dish.)

(If you can’t get dried mushrooms, just use the 200ml warm water!)

200g fresh mushrooms–sliced thin

11/2 leeks–chopped fine

200g pearl barley–rinsed thoroughly until the water runs clear

1 tsp fresh thyme–chopped

600ml stock–I use organic vegetable stock cubes

2 tblsps white wine

50g/2oz Parmesan–grated

black pepper and salt

heat the oven to 190C/380F

  • Put the dried mushrooms in a bowl and pour over 200ml hot water–leave to soften for 20 minutes.

  • Then strain into a bowl, reserving the liquid.
  • Chop the mushrooms ready for use.
  • Put the garlic cloves in a bowl and mix with a tablespoon of olive oil.

  • Empty them onto a shallow oven tray.
  • Bake for about 15 to 20 minutes until they are soft–and set aside to cool.
  • Peel them and fork them into a mush–this is a messy business but it ends with a satisfying licking of the fingers.

  • Heat two tablespoons of oil in a pan and sauté the mushrooms until they start to colour (this happens after they have released their moisture), then set aside.

  • Heat the last tablespoon of oil in a medium casserole (the one in which you will serve the risotto) and sauté the leeks over a medium heat until they soften and colour a little.

  • Add the wine and let it evaporate, stirring the while.
  • Mix in the pearl barley, thyme and cooked garlic mush.

  • Have the stock in a pan close by–simmering on a low heat.
  • Add the stock a ladle at a time, stirring often, taking care the mix  doesn’t catch.

  • Followed by the mushroom water–if you are using dried mushrooms–or warm water if not.
  • When the barley is soft but still has a little bite in the centre–this took about 20 minutes this morning–the risotto is ready for the mushrooms–dry and fresh.
  • Add them and stir in, followed by the parmesan cheese.

  • Season with black pepper and salt.
  • Meredith recommended a sprinkling of parsley at the finish–and she’s right!

Read Full Post »

Hard to resist this photo!

It was hard to resist the thing itself!

I bought this beauty in Castres market on Saturday morning from a young woman’s stall that was covered in pumpkins of all sizes.

I liked shape of the 2e too!

She told me not to peel it–just scoop out the seeds and cut it into chunks.

The skin and flesh contain vitamin A, flavonoid poly-phenolic antioxidants such as leutin, xanthin, and carotenes in abundance; in other words health giving properties–good things!

This idea is an aside in the Riverford Farm Cookbook (a treasure trove).

for two

1 smallish pumpkin–about 1 kilo/2lbs–quartered, seeded and cut into chunks

1 tsp cumin powder

salt and pepper

1 red chili–chopped

1 garlic clove–chopped

2 tblsps olive oil

roasted pumpkin seeds

heat the oven to 200C/400F

  • Put the pumpkin pieces in a bowl and spoon in the olive oil.
  • Turn them over thoroughly in the oil.
  • Sprinkle over the cumin powder and season with salt and pepper–mix again.
  • Empty the contents of the bowl onto a shallow oven tray.

  • Bake this for about 20 minutes or until the pumpkin pieces are tender.
  • Then take the tray out of the oven and sprinkle the garlic and chili over and cook for another five minutes.

  • Serve with dollops of humous and some roasted pumpkin seeds sprinkled over.

Meredith tells me most pumpkins sold in America are carved up for jack o’lanterns–not supper!

Happy Halloween Everyone!

Read Full Post »

We had simple salmon fillet for supper the evening that we returned from the clinic.

The next night I felt a little more adventurous, but in need of something easy and preferably from a single pot–a ladleful of taste over some basmati brown rice; comfort food that cooks itself.

I looked in the fridge and found a cauliflower in good condition, a leek and a bottle of chickpeas on the shelf in the larder and I knew there were a few small tomatoes left to gather at the end of the garden–perfect!

I love buying cauliflowers–their tight white heads look so tempting and beautiful.

However sometimes they stay in the fridge–not exactly forgotten, but requiring some thought.

What am I going to do with that cauliflower?!

Cosy cauliflower curry–why not?

Here goes…!

1 onion--chopped small

2 garlic cloves–chopped

2 tblsps olive oil

1 tsp black mustard seeds

1 tsp each of turmeric, cumin powder and ginger powder

1/2 tsp each of coriander powder, cayenne powder

8oz tomatoes–chopped roughly

1 pint/450 ml stock–I use organic vegetable stock cubes

1 cauliflower–separated into bite-size florets

1 leek–cleaned and sliced

3 tblsps cooked chickpeas (from a tin [a can] or bottle–you may not need the whole tin. Spoon out the required amount and drain off any liquid–but no need to rinse.)

salt and pepper

2 tblsps of whisked low/no fat yogurt or coconut cream (my new discovery; more on that in future posts)

  • Sweat the onion and garlic in the olive oil until they soften and begin to colour.

  • Add the mustard seeds and let them cook for a minute.

  • Add the rest of the spices and mix them in.

  • Add the tomatoes, stirring them into the spice mix and cook for five minutes to break them down a little and form a sauce.

  • Add half the stock and cook for a further 5 minutes–reducing it a little.

  • Mix in the sliced leeks and the broken up cauliflower–you may find you only need half the head–making sure the vegetables are immersed in the liquid.

  • Cover and cook on a low heat for 30 minutes–checking now and then in case it’s drying up–as it very nearly did for me!
  • (Add more stock as you need and cook on.)
  • Add the chickpeas and cook a further five minutes.

  • When the vegetables are tender, turn off the heat and let it cool down.
  • Fold in the yogurt or coconut cream.
  • Gently reheat to serve over some basmati brown rice.
  • There was a thumbs-up from Meredith as she helped herself to a spoonful more (see above)!

Read Full Post »

« Newer Posts - Older Posts »